I am not ashamed at admitting this. The first cheesecake I ever ate and enjoyed was fridge-set and on an airplane. It was a simple New York cheesecake and it was bloody good. Since then I have eaten better and made better. I will never forget my first cheesecake though.
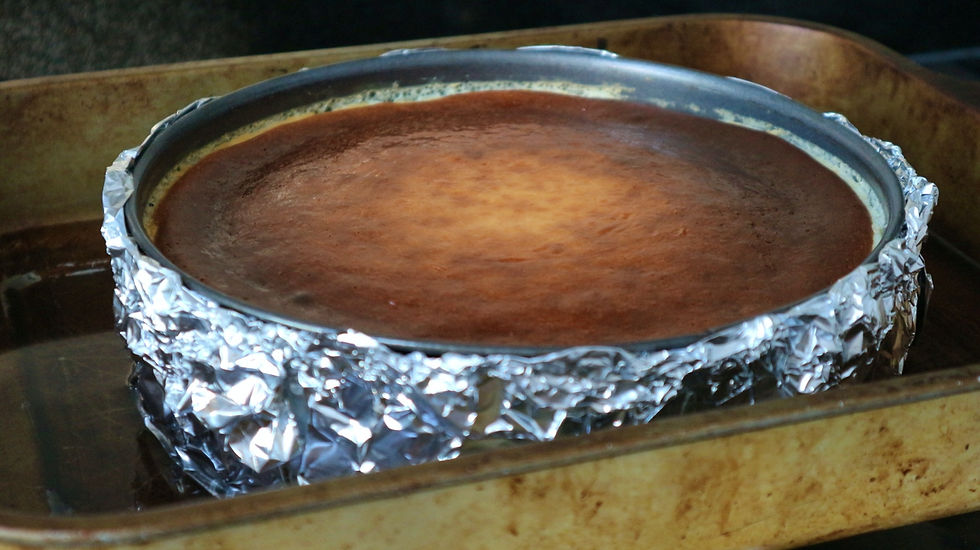
I think baked cheesecakes can seem a little daunting. They can appear to be a little more fiddly than fridge-set cheesecakes, difficult to bake, and there's the big worry they will crack open when you remove them from the oven. My recipe for baked NY cheesecake is utterly delicious and yet isn't overly complicated when you break it down. You're using a food processor to make the base and an electric whisk to make the cheese mixture. The bake requires a Bain Marie which is a fancy way of saying you're baking the cake in a water bath. In short you're wrapping the cake tin in foil, sitting it in a roasting tin and pouring boiling water around the sides. As for cracking the cake, the key thing is temperature. Try and bake the cake too quickly at a high heat and then remove it from the oven and it will crack as the cake doesn't have time to adjust to the extreme change in temperatures. Bake the cake at a moderate temperature and leave it to rest in the oven and you will get the perfect top. The main thing you need when baking a cheesecake is patience, and it's worth the wait!
If you enjoy making this then give my Japanese Cotton Cheesecake a go. They both taste alike although the Cotton Cheesecake is VERY light, soft, and even more addictive!

Serves The Golden Girls or 12-16
Hands-on Time 30 minutes
Baking Time 205 minutes
Ingredients
200g Digestives
210g plus 1 tbsp Caster sugar
1/4 tsp Fine salt
130g Unsalted butter (softened)
800g Cream cheese (room temperature)
55g Cornflour
3/4 tsp Vanilla bean paste or the seeds from 1 vanilla pod
1 Lemon
4 Eggs, large
300ml Sour cream
Equipment
Food processor
Microwaveable bowl
Microwave
Spatula
20cm Springform tin
Large mixing bowl
Electric whisk
Micro-grater
Juicer
Pastry brush
Extra-wide tin foil
Large deep-sided roasting tin
1 Kettle of water
Preheat the oven to 180°C/160°C(Fan)/350°F/Gas mark 4.
Add the digestives to the food processor bowl along with 1 tablespoon of sugar and 1/8 teaspoon of salt.

Blitz until you have a fine powder.

Add 90g of butter to a small microwaveable bowl and pop into the microwave for a couple of seconds until melted. Don’t let it run for more than 30 seconds at a time otherwise it may spit!

Whilst the food processor is running, slowly pour in melted butter.

Switch off the processor and remove the lid, you should have what looks like wet sand.

Using the spatula, tip the mixture into the tin and press down until level. I find it’s best to press down using my hands.

Pop the tin onto the middle shelf of the oven for 10 minutes.
Once the time is up, remove the tin from the oven and turn the temperature down to 160°C/140°C(Fan)/325°F/Gas mark 3.

Now to get on with making a filling.
Add the cream cheese along with 30g of butter to a large mixing bowl and whisk on a medium-high speed for up to 5 minutes until you have a lightly whipped mixture.

Add 1/8 teaspoon of salt, 210g of sugar, and cornflour to the mixture and beat until combined.

Grate zest of a lemon and then squeeze the juice over the mixture. Add the vanilla and give a quick whisk.

Add the eggs to the mixture and again give a quick whisk.

Finally, add the sour cream and give one final whisk. Scrape down the sides of the bowl with a clean spatula so that everything is combined.
Clean the microwaveable bowl and add the remaining 10g of butter to it. Pop into the microwave for a few seconds until melted.
Brush the insides of the tin with the melted butter. Try not to dislodge the base and get crumbs stuck on the side.
Take a large square of foil and place the tin onto the centre of it. Fold the sides up so they are firmly hugging the tin. You want to make sure that there are no rips or gaps so that water can get in!
Carefully pour the mixture into the cake over the base.

Give the tin a few taps on the worktop to remove any visible large bubbles.

Place the tin onto the roasting tin and put onto the middle shelf of the oven. With the door still open, carefully and quickly pour the kettle of boiled water into the roasting tin.

Close the oven door and leave to bake for 75 minutes.
When the time is up, turn the oven off and leave the cake to sit in the oven for a further 2 hours. You could always leave the cake to sit overnight if you’re baking this late in the day.
Once the time has passed and the oven is cool, remove the roasting tin.

You may need to place the foil cladded tin onto a tea towel to dry the bottom.
Peel away the foil from the sides and lift the cake tin out. You may find a little water found its way between the foil and the cake tin from the steam. Do not worry.
I find it’s best to pop the cheesecake into the fridge for a few hours before serving. That’s provided you can wait that long.
You may need to run a palette knife around the edge of the cake to remove it from the pan. Best to do this before you spring the tin open and rip the cake apart!

Enjoy!

